The Cornell Note-taking method is more than a way to take focused notes and capture ideas. These notes can transform your learning skills and allow you to keep information better. I’ll show you how to make a Cornell Notes Template with Microsoft Word in this tutorial. (Includes finished files.)
If you’re unfamiliar with Cornell Notes and the student benefits, take 5 minutes to watch this video presented by a biology teacher. She does a nice job summarizing the note-taking technique and main ideas. This technique is equally as effective outside the physical classroom. For example, it works equally well if you’re doing an online class, attending a conference lecture, or homeschooling.
The concept is to do note-taking in a structured way using a suggested layout that facilitates learning. Each defined area has a specific purpose when you take notes and review them. However, it’s not so structured that you can’t personalize it. Instead, think of it as a focus notes template.
In the last few years, more people have been doing online classes and inquiring about “pretty notes” or “aesthetic notes.” These are loosely defined phrases where the note-taker emphasizes colors, fonts, bullets, and other styling.
While these other note types weren’t part of the original design by Walter Pauk of Cornell University, their visual clues may help in learning. Feel free to edit the downloadable Word template to adapt to your aesthetics.
When I wrote this article in 2005, the technology was different, and no one made a Cornell Notes paper. Levenger made something that was close but didn’t have the Summary section. Since then, several vendors have popped up. These are notebooks specifically designed for Cornell Notes. Here are some vendors I have found.
(Please note that I am an Amazon affiliate and will make a small commission if you purchase through them.)
Microsoft Word templates are a special type of file designed for reuse. Templates provide the structure and more items, such as auto text entries and macros. They are the basis by which Word documents are created, whether it’s a new document or you want to make a letterhead template. In fact, Microsoft Word starts by opening a blank page based on an autostart macro in the normal.dotm template.
Microsoft Word comes with many pre-built templates and groups them by function. You may have other templates that add-in tools or programs have created. You see this interface when you select File | New. You’ll see a listing of your available templates below the top row under the personal section.
There are actually 2 Cornell method templates attached to this tutorial.
This ruled template was designed to be very simple. You can either use it as the source for new documents or print copies. I intentionally kept the document black and white even though I’ve seen templates with color background areas. While color has its benefits, it can be costly if you need to print these out. But, again, if you’re an aesthetic notes fan, you might prefer color.
Also, I kept the top section blank instead of putting specific fields for the class, teacher, etc. This generic approach allows you to use it for other learning scenarios like conferences. Feel free to add your own keyboard symbols or customizations. If you’re adventurous, you can even add a Word watermark.
The template also has X‘s in the Cue Column. This was a request from people who wanted to punch holes to place the notes in a ringed binder. You can delete those if you don’t need them.
This is the same design as the Word template. However, it’s not meant to be an interactive PDF file. It’s best used for making printed copies. Some commercial printers prefer the PDF file format.
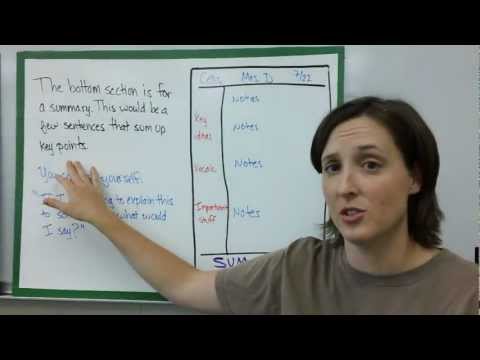
If you’ve not seen the Cornell Note-taking system, it divides an 8.5″ x 11″ page into three sections:

Depending on your preferences, some people like to have the note-taking area (2) lined like notepaper. So, for our template, we’ll add the lines. I’m figuring the student will probably be taking handwritten notes.
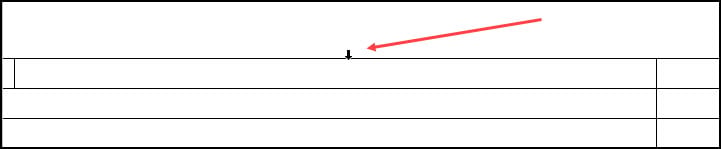

You should now have two equal-width table columns. The first column will not have any lines.

In the initial example, you can see that the two columns are the same width. You may adjust the column widths and row height to your desired settings.

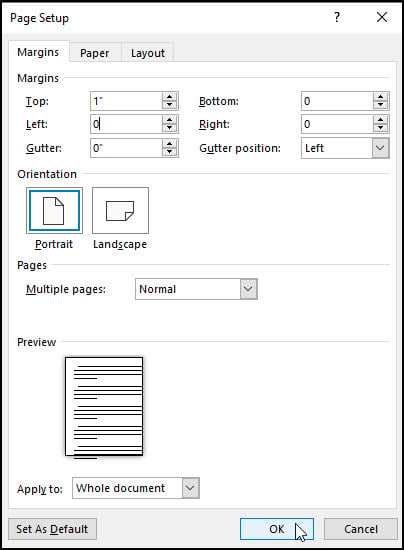
If you go to Print Preview, you will see the cell lines in the Cue column (1) do not display, and you have a Summary area (3) at the bottom. I intentionally added 1″ before the table, making it easier to adjust the position or add a description. At this stage, you can change the dimensions to meet your needs.
C:\Users\Anne\Documents\Custom Office Templates\
However, in older versions of Microsoft Word, my location was:
C:\Users\Anne\AppData\Roaming\Microsoft\Templates
Alternatively, you can hover over an existing template and see the file location.


Your document will open, and you can make further changes. For example, some people may want to adjust the top area to type Class name and date. That’s why I added the paragraph break before the table. Other people put their names in case the notes are lost. Finally, print out how many copies you need and head to class.
Although I built this template with Microsoft Word, it works with Google Docs. You might want to create a folder to put your template files. The paid version, which is part of Google Suite, allows you to create private templates.
You now have 2 copies of the file and can use one as the source the next time it is needed.
The Cornell Notes system has held the test of time since Dr. Pauk conceived it in the 1950s when he was the Director of the Reading and Study Skills Center at Cornell. Seventy years later, students are still benefitting from the note-taking method. The only difference is how we produce the note sheets and add our aesthetics.